This is our old, outdated site. You will be redirected to our current website in a moment.

Thank you, Thatresourcesite.com

Showing posts with label lapbooking. Show all posts

A Little Lesson to Learn the History of the Priesthood

 A brief overview of the Biblical roots of the priesthood and its nature for discussion and some notes for lapbooking.

Having just recently taken an intense course on the Theology of the Body focusing on the papal teachings and wisdom of Pope John Paul II,  I listened to our speaker, Fr. Alan Boisclair, explain about the tremendous love that calls a man to the priesthood.  It was completely inspiring.  So I can tell you that I was completely excited to learn that a Little Lesson on a Brief History of the Priesthood by Mum6kids, Shell, over at Thinking Love, No Twaddle was ready to help me shed even more light on the awesomeness of the priesthood for my kiddos.

This 34 page resource pack gives tons of interesting information about the sacrament of Holy Orders, more commonly known as the priesthood.  Expect to read all kinds of historical facts as well as a bit of history about the author and her spiritual journey.  Quite inspirational to see how God has worked in each of our lives.  The root question about the authority of the Church and  her pope and bishops is answered quite well in this introductory resource.

This lesson is thought provoking as almost all her Little Lessons are, but it is unique in that it lends itself very well to discussions utilizing coloured question prompts.  This meas that families can discuss this together and those who have already been confirmed or who are strong readers will find this a great independent read.  Shell has included some great go-alongs including notebooking sheets, lapbooking (F3) pieces and little pieces that could be used as writing prompts, flaps or timeline pieces.  Here are a few samples for you.


We look forward to using this lesson in our own little homeschool and invite you to do the same. 

Thanks for all of your energy and love of our Faith, Shell!  God bless you and your family for all you do to bring and explain the faith to others.

Click HERE to see this and all of Shell's Little Faith Building Lessons.
Click HERE to see all of Shell's Little Lessons and freebies she has shared.

Blessings,
Kalei

LIttle Lesson is Perfect for Teaching About Heroism

Little lapbook lesson brings an old heroine to life.

Looking for a little side lesson to help bring a bit of extra history or geography to life while focusing on a truly heroic young lady?  If you wish it were a bit of a cut-n-paste, "doing something" learning activity too, then we may have just the thing for you and the kiddos.  Shell of Thinking Love, No Twaddle has just shared with us a little lesson she created about Grace Darling. 

Fifty Famous Stories Retold [50 FAMOUS STORIES RETOLD]I remember first reading about Grace Darling in Fifty Famous Stories Retold  by James Baldwin.  This was a beloved read-aloud that is very popular with Charlotte Mason Style learners.  We read it about four years ago and are getting ready to embark on a second reading this coming September.  This latest lesson from Shell is a perfect addition to your reading of the story entitled, simply, Grace Darling.

In this self-contained lesson you will find background information about the heroism of Grace Darling plus a few pages of lapbook pieces.  It is a great story and the pieces are inviting and colourful.  She has created the file so that it can be printed double sided without cutting the text part of the lesson off with the lapbooking pieces.

Here is a peak at some of the pages:


Click HERE to see this and other history lessons created by Shell.
Click HERE to see all of Shell's free creations she has shared with us.

Check back with us shortly as we have a few other resources to share from Shell.

Blessings,
Kalei

New Little Lesson for Easter - Via Guade! The Road of Joy! plus a new weekly planner set too!

New Easter Lesson is the perfect compliment for Bible, Faith or Seasonal Study.

We are over half way through Lent.  Easter will soon be upon us.  Our focus will shift from our suffering Lord to our Risen Lord.  We will walk soon walk down the Road of Joy - Via Guade, with our Lord.  To help make this walk more meaningful, Shell of Thinking Love, No Twaddle has written this WONDERFUL 58 page lesson for our families. 

This new lesson is chalked full of wonderful classic artwork, fun F3 (lapbooking) pieces that reinforce the material, scripture references, mapping exposure, notebooking and copywork opportunities plus some great pieces that could be used for timeline work as well.  You will learn about the events of the Resurrection, the twelve apostles, the gifts of the Holy Spirit, the Sacrament of Confirmation and so much more.  Add a wonderfully written text that expresses one homeschooling mums love for her faith, and you have a wonderfully complete lesson perfect to celebrate the liturgical season. 

Here are just a few of the pages for you to get an idea of just how bright and engaging this lesson could be for your learners or family.  Click the thumbnail towards the bottom of the post to see an overall view.


And as if that weren't enough, Shell has left some pages blank for easy printing back to back - I love that!  We are just finishing up her Via Dolorosa lesson for Lent in our family and we are really looking forward to starting this one - the timing couldn't be more perfect.  This freebie is a wonderful testimony to the richness of our faith and the love and desire that we have to share it with others.

I know that Shell has been at work for a while on this lesson and I am so thankful that she took the time and care to create this great resource for her own kiddos and share it with us.  We really enjoy her lessons and I love reading her blog.  If you have never stopped by her blog, you should drop in to take a peek at her wonderfully fresh insights into many different homeschooling and liturgical topics.  She also has many great links to free resources too.  Her life is truly inspiring as well. 

And before I forget, Shell also made a cheery little three page weekly planning sheet set that puts many different areas we need to organize into one place.  This could be used in conjunction with her monthly planning sets or used by itself.  They are cute and many will find these quite useful.

Click HERE to download the Via Guade Easter Lesson.
Click HERE to download the new planner set or any of her planner sets.
Click HERE to see all of Shell's shared resources.


If you would like to see a larger sample of pages in this file, click the image below to view the thumbnails.


Please keep Shell and her family and me and my family in your prayers as we continue to try and share what we make for our families with your family. :)

Blessings,

Kalei

Advent. . .the Coming F3 Lapbook Style Activity and Go-Along Notebooking Sheet


Fun activities help children learn about and invite the season of Advent into their hearts and minds.

Advent begins this weekend.  It is the season that prepares us for the nativity of our Lord, Jesus Christ.  Today we offer a very fun and effective way of reviewing the main points of Advent using our F3 lapbook style activity sheet and a specialized set of notebooking papers.

The F3 activity presents the concept of your child being a Faith Detective as they learn about their faith.  It is self contained and can be used alone or added to a current F3 folder or project you may already have on the go.   In a question filled, clue-finding way, children are presented with the following questions and asked to figure them out.


Who's coming?
When are they coming?
Why are they coming?
Where are they coming?

Using the sheets provided, scissors and glue, they can create and write the answers to the questions out themselves using resources they have at home or info from formal lessons or they can use the answers provided for them in boxes that they simply cut and glue into place.  This helps younger learners who are not confident writers to easily complete this activity as well as CCD classes who may have a time constraint to work around or with.  answers are given.  Instructions are included on the individual sheets and labels are provided in gray to help children glue things properly into place.


As an additional fun activity, older learners may want to complete one of our newspaper style notebooking sheets to write an "article" about Advent or the Nativity itself.  The notebooking sheets are available in different styles with opportunities for drawing or attaching a photograph about the forthcoming important events.

We hope this helps you start your season of preparation for our Lord with thoughtfulness, smiles and joy!!

Click HERE to get the Advent Faith Detective F3 Activity.
Click HERE to get the Newspaper Style Notebooking Sheets.

Blessings,

That Resource Team

F3 Pieces for Each of Elements and a New Idea for F3 Fans

Flip, Flap & Fold Pieces help bring the elements to life in a new easy to make notebook project.

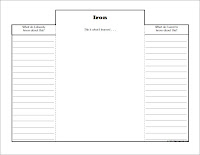
So I knew this request would be inevitably coming from my daughter, "Mom can you make an F3 piece for each of the elements of the periodic table?" And so it did yesterday.  I began working on the element pieces in the same style as the physics/chemistry term pieces as she requested.    They are simple to use and non-threatening.  They can help learners acknowledge information that they already know, think about what they still want to know about the element as well as note what they learn on their journey of discovery.  This CM inspired resource is far different than a fill in the blank worksheet in that children learn and create out of what inspires and moves from the material. But the question for me then became what to do with all the finished pieces??


I realized just how lovely these little pieces of paper grew to be in the hands of my child.  The joy that they inspired for a subject that was once met with apathy, disdain and at one point rebellion.  But what do we do with all of these pieces??  We didn't want to create a full F3 Folder for each one as that was way to daunting a task.  So we put our heads together and came up with this really great notebook project that anyone can make.  You really just need some cardstock, (coloured cardstock works great), two pieces of cardboard - even a cereal box will do, and something to bind it with.  We used a comb bind spine but you can also use a hole punch and insert rings, long twist ties, twine - anything really.  This project can be as simple or as fancy as you want it to be.

Sample pages from our scientific terms notebook.
Simply cut the cardstock in half (8.5"x5.5").  Use as many sheets as you desire.  Stack in a rainbow array of colours. Cut your two cardboard pieces slightly larger than the half sheets.  We added .25" to each side.  Bind at the shorter end using your method of preference and voila your notebook is ready.  Decorate the cover as desired.

As your learner completes the F3 element pieces they simply affix them to a page in their new notebook.  They fit absolutely perfectly for this project.  You may want to do what my daughter did which was to create a whole notebooks of scientific terms and info.  Just a thought.

The links below provide the files to specific element pieces.  Use as few or as many as you desire. 
Click Here to download the F3 Pieces for elements No. 1-25
Click Here to download the F3 Pieces for elements No. 26-50
Click Here to download the F3 Pieces for elements No. 51-75
Click Here to download the F3 Pieces for elements No. 76-100
Click Here to download the F3 Pieces for elements No. 101-118

We hope this inspires your child to learn about the elements in a fun and very engaging way.

Blessings,

Kalei - That Resource Team

How to Make Our F3 Folders

Finally..Here's how to make our F3 Folders that are made to fit 3-ringed binders.

So, we know F3 is a strange name but it really is about the 3 Fs to do with the folder - flip, flap, fold.  Now lapbooking is neat and cute and very warm and fuzzy and I know people who do GREAT and extravagant lapbooks.  Unfortunately for us, it is way too much of a task for us complete a lapbook project at once.  The kids get overwhelmed by the sheer number of pieces in most premade packets.  They often get tired of the topic or the tediousness required to make all of the pieces.  Many times our kids want to switch to notebooking part way through a topic or use some of our own worksheets or resources.  We found that just a few pieces are often enough for us and many times we like to incorporate the piece directly into a little lesson type worksheet that then needs to find a home.  Some lapbookers can be bit of purists and feel that worksheets shouldn't really go into lapbooks.  We did not want to limit our children's learning activities to what could be pasted into or onto a file folder and we wanted everything we used - notebooking sheets, cut-n-paste activities, handouts, worksheets - to be kept in one spot and be able to be placed neatly on a shelf in a normal position.  Thus the F3 Folder was born.

This post explains how to create these folders in detail.  They are neat and fun to use but they do require a bit of work and a touch of patience to make them initially.  Once you get the hang of it, it's easy.  I usually make a whole pile at once.  (I even use this style of learning in my CCD class.  I will share more on that in another post.)

F3 Folders are made out of two manila folders, connected together especially designed to fit in a 3-ring binder. The folders extend out of the folder while still contained in the rings and can always be added to with more folders to accommodate any project including timelines. No more trying to find homes for odd-shaped paper projects or even storyboards. We like to use folders of various colours for different months projects, subjects, or topics and we are never afraid to have a few going at once..lol.

Note: We have found a bit of variation in folder sizes (measurements) from brand to brand and style to style.  **Remember the old rule, measure twice and cut once. 

To create our F3 Folder you will need:

  • 2 - letter size (8.5"x11") manila file folders (Placement of tabs and folds may vary from below according to brands or varieties.)
  • clear packing tape (with a cutter or on a tape gun for ease)
  • paper cutter with ruler
  • 1 - 3-ring binder
  • a pencil to mark with
  • a ruler - if your cutter doesn't have one
  • 1 - 3 holed punch
Here is a general overview graphic.


Step 1: Keeping both folders closed and the tabs to the left, mark and trim off 1/2" from the bottom of both folders. Make sure that you cut both folders facing the same direction with tabs to the left.


Step 2: Select one folder to work with. Keeping the folder closed with the fold to your left, trim its closed width to 7 3/4".
Step 2

Step 3: Select the second folder. Measuring carefully from the outside centre-fold, trim the right side from the fold to 7 3/4" and the left side from the centre-fold to 8 7/8". (See graphic above.) When closed, the top flap of the folder should appear shorter than the bottom. You will end up cutting off the tabs.
Step 3


Step 4: Continuing with the same fold, using your 3-hole punch, carefully punch holes on the edge of the flap that measures 8 7/8".  (Again, see graphic above.) It will be the side that goes into the rings of the folder. 

Step 4

Step 5: Open both folders out flat with the insides facing toward the table. Match up the sides/edges measuring 7 3/4" and tape them together on the outside using clear packing tape; using a helper can make it a bit easier.
Step 5


Step 6: Fold up folders with the outside flaps together and put into your binder. If more space is needed for projects simply tape on another folder like that used in Step 2. [We have used a total of three folders accordion folded before and have had joyous results.]

You can now affix your F3 Pieces to your folder on the inside of the folders. It is always easier to affix things with the F3 folder inside the binder but if you prefer to affix things with the folder say, on a table, make sure the holes face the left side other wise pieces you glue in may appear upside down. Worksheets and reference sheets can fit into the F3 folder in-between the folder flaps. They close up quite nicely and keep like themed resources together.
Step 6

We hope you find this project helpful and useful.  It is a great way to keep all kinds of topic resources together.  You may find that your first folder may not come out exactly perfect.  Ours didn't either..lol.  But, it really is worth the effort to have projects kept neatly on a shelf and everything kept together for future reference and keepsake browsing. 

Blessings,

That Resource Team